Hands down the best part of DIY is looking at before and after pictures. Even though I don't have a complete after picture for this project I have some SERIOUS progress going on. We are busy over here and I FINALLY have some things to share with you. We actually have a deadline for our projects (more on that later), so hopefully I can keep more up to date with it on the blog.
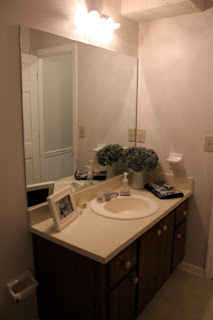
Our house is very 1986. It was built in 1986 and has not been updated AT ALL. Well, unless you count layers of wallpaper covered with paint updating....which I don't. All of our counter tops are laminate, our floors are laminate, and our mirrors are builder grade. Don't even get me started on our light fixtures and hardware. We would love to do full overhauls of the kitchen and all 3 bathrooms but that is not in the price range right now. We decided to find ways to update our house without breaking the bank. First we are starting with our half bathroom. Remember when we moved in and it looked like this?
Then we took off 3 layers of wallpaper, removed the chair rail, took of a huge towel rack, and painted the walls. Then it started to look slightly better, looking like this.
We laid out our plans and it went a little something like this:
-Replace light fixture
-Remove all ceramic fixtures and replace with brushed nickel hardware
-Paint vanity
-Paint counter tops (ooooh yeah)
-Frame mirror
We are well underway on our budget friendly overhaul. First up is the counter tops. Well we actually started with an explosion of stuff (please ignore the mess, I am a messy DIYer). Oh and yes that is a GIGANTIC soda...no judging.
We started with painting the vanity a nice shade of white, decorators white by Benjamin Moore color matched to Sherwin Williams Pro Classic paint to be exact. Well you can see that painting the vanity white really brought out the awesome shade of nasty in the counters.
I did a lot of research on painting laminate counter tops and have read great things about Rustoleum counter top paint. After a lot of thought we decided to go for it. They have 16 different color selections and we ended up going for a charcoalish color called Clay. Well we LOVE it! It turned out better than I expected! See for yourself.
What a difference paint can make!
The process was pretty easy. I started cleaning the counters with a surface cleaner and followed that with some love from the magic eraser. After letting them dry I taped off the sink, walls, and mirror. I don't normally tape but I wasn't sure what the consistency would be like so I wanted to be safe. I am very glad I taped because it was thick and not easy to remove (like when I ran into the door frame with my roller).
I used both a roller and a high quality angle brush. It went on thick and dried fairly fast so I had to work quick. I did notice that I had brush marks but I could no longer see the marks as the paint started to dry. I also read that it is best to remove the tape while the paint is still wet to prevent from pulling of paint with the tape. It really did turn out with a nice smooth finish.
Yes that is a new faucet...more on that later.
I have a few more touch ups and some caulking to do but I have to wait 48 hours to touch up. It takes around 72 hours to dry before we can even touch the counters. Oh and also it is smmmmeeelllly. But the result is totally worth it. Budget friendly DIY all the way.
Next project on deck. Finishing up the vanity doors/drawers. Now if the paint would just dry in this humidity I might actually get somewhere.


A few years ago we ran a series called February Jumpstart, where readers did a cool project in their kitchen and showed us the results. We were just thinking about this kitchen project, and wanted to show it to you. quartz countertops
ReplyDelete