Monday, October 27, 2014

2 Down, 9 To Go: Painting Interior Doors

I have been MIA from house projects lately. Apparently newborns and toddlers take up quite a bit of time. I am now getting back into project mode. I have a long list of things to get done before the end of the year and if I get half of my list done I will call that a success. 

This week I dusted off my angle brush, grabbed my trusty white paint, and got to work. I have decided that it is the time to paint all the doors...and I mean ALL the doors. Eleven doors total. Just like the trim, all the doors in our house are an orange oak color. I plan on slowly painting the doorways and doors a nice bright white. I know I know...what a surprise. White does wonders. It looks so clean and brings in lots of light. 

I don't have the best before pictures but these will give you an idea of what we were working with. 
Looking down the hallway.

The picture below was after we painted the walls, trim, ceilings, and doorbell.

Our progress pictures are below. I have started in the hallway and painted 2 out of the 5 doors. 

I can't wait to see the entire hallway finished. I think it looks significantly better. I used 2 coats of Kilz No-VOC primer and 2 coats of a low VOC semi gloss white. I used an angle brush on the trim and a roller on the doors. I made the mistake of painting under the hinges on the first door. It makes the door a little tight. I may have to go back and fix up the first door. The second door I broke the doorknob and locked myself inside the room (Brian had to rescue me). I figure by the time I get to the last door I will be an expert. 

I also gave the hardware a little face lift. I had some Rustoleum ORB (oil rubbed bronze) in our paint storage and I gave it a try. I love the way they turned out. 
Just an idea of how I painted the hardware. I poked the screws into the cardboard so they would stay upright. Two light coats was plenty of coverage.

As you can see in the pictures above I have started to hang up stuff around the house as well. I've decided to have a floor to ceiling gallery in the hallway. I didn't want it to be entirely random so I picked a travel theme for the hallway gallery. I started with a drawing I did of one of my favorite quotes by St. Augustine, "The world is a book and those who do not travel read only a page". Once that was framed and centered I have been building on that. The pictures and paintings are places that we have travelled or lived.  

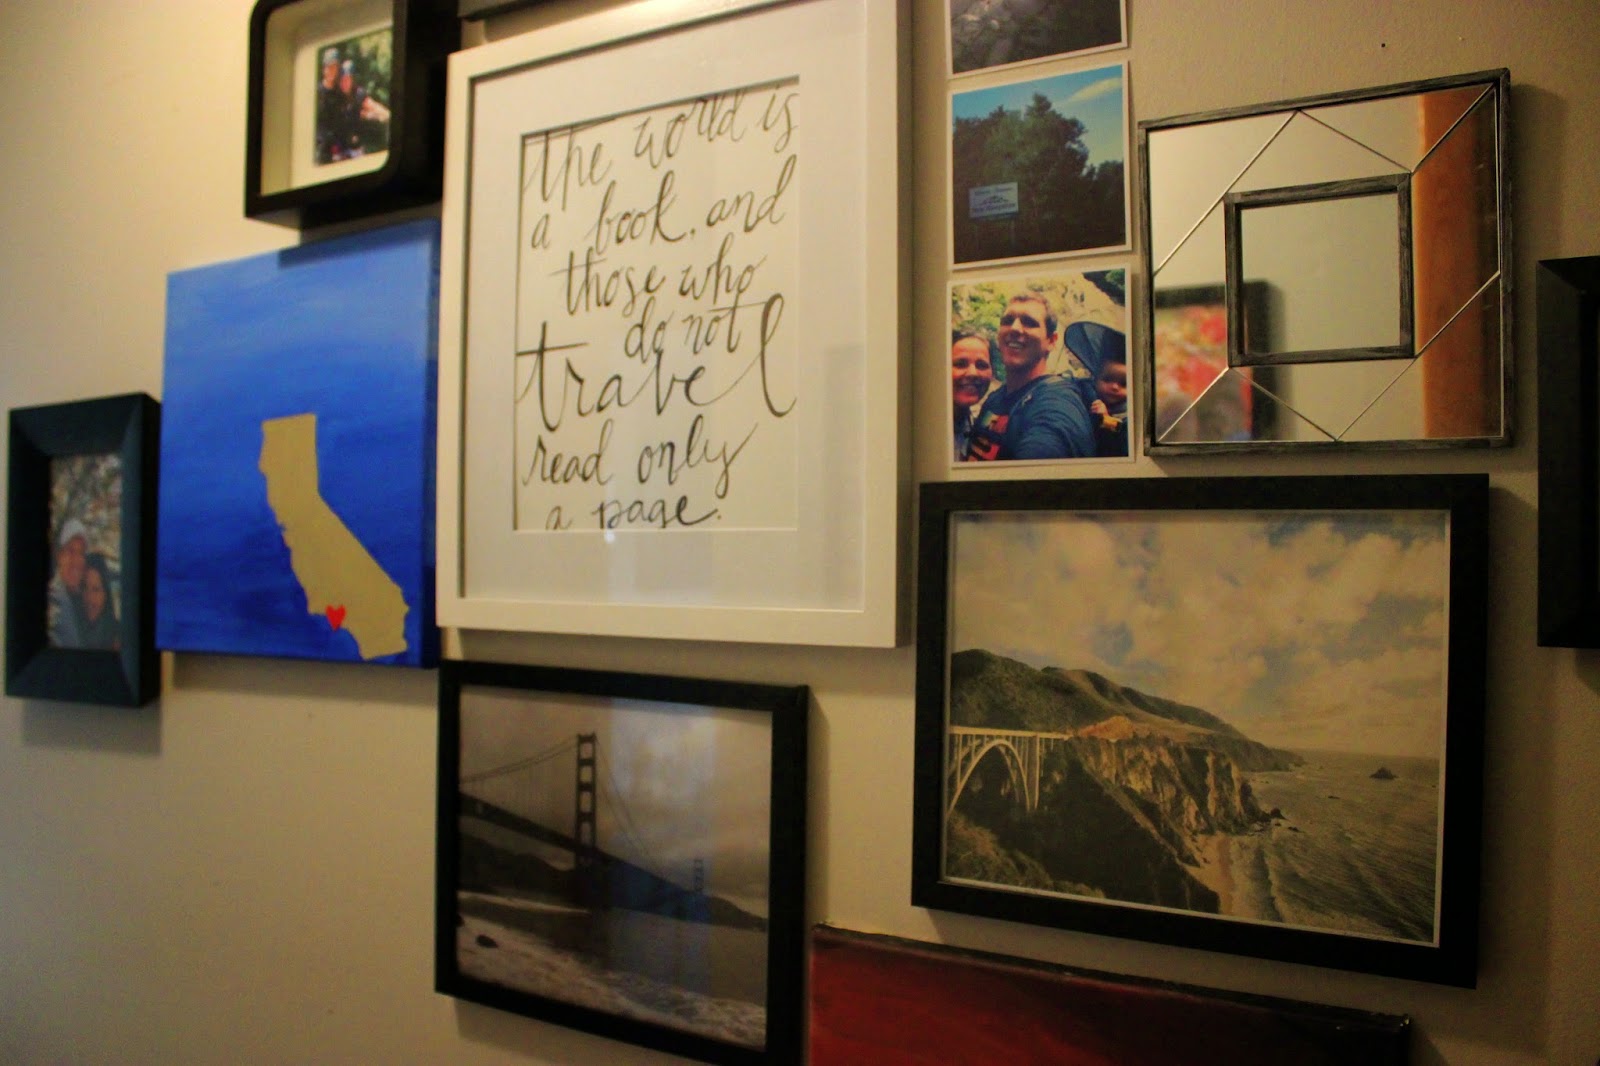
 I really look forward to building on this wall.  

Hopefully it won't be months before my next update. If anyone has advice on how to manage 2 kids, play dates, walking the dog, cleaning the house, laundry, exercising, cooking dinner, AND diy work let me know. I am over my head most days so those two doors took me 4 days, a messy house and a lot of diet coke to complete. 

Happy Monday! 

Monday, August 18, 2014

Amelia's Toddler Room: Progress

We have been busy trying to get Amelia's toddler room ready for her 2nd birthday this month. Last time we checked in on Amelia's room she was sleeping in a very plain nursery with zero decoration. I shared my plans in this post. Here is a look back at her first room in our Maine house. 

Pretty boring. 

We decided to move her into another bedroom with a larger closet and we will be moving Colette into this nursery eventually. 

The room we are moving Amelia into used to serve as the master bedroom for the person who lived here before us. We have discovered as the temperature went up that we could smell a little bit of a smoke odor, mostly in this room. She clearly was a smoker based on the yellowing ceiling and lingering odor. Here are some before pictures after we painted the ceiling. 

The closet is where most of the smoke smell hung out. We got some lava rocks and those helped with the odor but we decided to just hit this room with tons of paint.

First we primed EVERYTHING. The walls got one coat and the trim got two. 

After everything was primed and ready I tackled the edging and trim and Brian tackled the walls.


After a short break to have a baby...we finally have some progress to share. We still have a lot to do, namely a bed, but I love how it is coming together.
We found the dresser last week at Habitat Restore (my favorite) and it fits perfectly.  
The blank wall is where her bed will be. I also plan on hanging some family pictures in some of the empty space. 
The black walls behind the door are, of course, chalkboard walls. It still needs to be conditioned and a little chalk holder and it will be ready for her creativity.

We put a mirror in her closet because she loves checking herself out (typical girl) and she also loves dancing in front of it. Eventually we will add some shelving in the closet and make it more functional. 


She loves having her books on display and I think they make the best decoration. I can't wait to change them out for the holidays. Also I am loving those kid lit books, so cute!

We still need to sew and hang the curtains, buy a twin bed, buy a rug, and find end tables and lamps. I do love the progress we've made so far. Amelia is the sweetest and it feels great to finally be able to give her a space that reflects her personality.

Happy Monday! 

Monday, July 28, 2014

A Bright Front Door

Remember this post back in April when I asked for help choosing a front door color. Well I finally got around to it this weekend and I am loving it. We ended up going with a bright beachy teal and I am so glad we went bold.

Before, 1st coast, 2nd coat

After three coats of Sherwin Williams Resilience, it looks so bright and cheerful. Brian and I are loving it. 

The process was very easy:
-Clean/sand door (prime if you are painting over wood)
-Use angle brush to get into the cracks.
-4" foam roller for the rest
-3 hour dry time in between coats and let cure before closing

Here are some more before and after pictures. Check out the difference in the lawn too. 


photobombing golden

This next picture is with the screen door closed. A total front door buzz kill. I may have Brian just remove it so we can fully show off the door. 


I love how it stands out. The color looks so good against the brick and the worn wood shingles. 

We still have a few things to add to the front porch but I love the progress. 

Happy Monday!


Tuesday, July 22, 2014

Hanging A Gallery Wall

After living in our house for 3 months we have finally hung the first picture frames on the wall. I have always been a fan of gallery wall but I have always been terrible at hanging them. Normally I try and eyeball it and then end up putting double the holes in the wall. This time I actually measured and planned and it was much faster and looks much better. 

Supplies needed:
-Frames 
-Butcher paper
-Sharpie
-Hammer/Nails
-Measuring tape

We have a big blank wall above our love-seat that has been screaming for us to hang something. We first tried hanging a painting and it was too much color with the couches. Then we tried a large mirror but it was the same width as the couch and looked terrible. I decided to gather up any white frames we have and do a little gallery style hanging. I plan on adding a lot more frames as I collect more, but this will do for now. 

I laid out the butcher paper and arranged the frames in a way that I liked. I like when things are mismatched without being random. 
After measuring the widths I traced the frames with sharpie. 
I hung up the butcher paper so the frames were centered over the couch, not the wall.  
I used a thumbtack to mark where the frames would need to hang. Once everything looked good I put the nails into the marks right through the paper and then just tore the paper down around the nails. 

There we have it, a gallery wall! Like I said earlier I want to add more frames but I like the arrangement for now.  


Friday, July 18, 2014

Guest Room/Office Progress

We are feeling the pressure to get some things done around here. In 2 weeks my mom and baby Yoast are on their way and we need places for them to sleep. We haven't made up a nursery yet because the baby will sleep in our room. Since we don't know the gender we are waiting until the baby is here with us to do the nursery.

Our house is 4 bedrooms with an office. Occasionally on a snow day Brian will stay home so we need a small space for him to work. We decided that a guest room with a small work space would be perfect. I like a multi-functional room. 

The space for our office needs A LOT of work. It has wood paneling with peeling wallpaper in an awful color. The trim and door are also a shade of dark grey. The walls need to be replaced with drywall eventually but for now we are gonna put some paint on it and save our pennies for a complete overhaul. Here are some cringe worthy before and in progress photos.


At this point we started to remove some of the peeling wallpaper. It is impossible to remove entirely.


Once we removed as much of the peeling wallpaper as we could we got to work with our trusty primer. 

After some ceiling paint, trim paint, 2 coats of primer, and 2 coats of paint we are looking like this. 

It looks better but still very rough. In the lighting the walls are giving off a pink/beige hue but the color is the light grey that we use all over. We didn't want to buy more paint for a room that we are going to tear the walls down anyway. 

You can see that painting over the wood panelling shows some flaws but it will work for now. 
Our temporary plans in here are adding curtains, a bed, bookshelves and a desk. I will post another update as soon as we get in looking somewhat like a guest room. 

Long term plans are as follows:
-Remove wood panelling and replace with drywall.
-Built in bookshelves and desk. 
-Large rug.
-Hooks for guests to hang up clothing and luggage stand. 
-Overhead lighting (none of the rooms in our house have overhead lighting).


That about sums it up. Now lets get some decor on these awesomely wood paneled walls. 

Monday, July 14, 2014

A Step Up

I had a burst of energy this week. After painting the hallway and FINALLY getting my house somewhat clean I decided to paint the stairs. When I have energy I have to take advantage of it because it doesn't come easily and I am a couple weeks away of having even less time and energy. 

Our house was built in 1970 and is very dated. We have been trying to figure out ways to update here and there and painting the stair risers is a perfect way for a quick and easy update. We have orangey wood floors that we would love to refinish in a walnut or darker stain. In the meantime we are gonna work with what we have.

Check out the difference... 


The process was really simple:
1. Clean. 
2. Tape (If you have unsteady hands like me).
3. Use a short handle angel brush.
4. Prime (I did 3 coats of Kilz latex primer).
5. Paint (I used 1-2 coats of off the shelf semi-gloss white).
6. Caulking and touch ups. 
7. Admire your work.

I still need to finish the caulking and touch ups but my pregnant body is tired from sitting on those stairs for so long. I have already moved on to admiring my work and loving it. 

I love small updates that make a huge difference.

For this space we still plan on doing a couple of things. We want to pull up the carpet that is covering the wood floor of the entry. It is  dirty and old. We also want to add a stair runner. In the winter we will be walking in with wet/snow boots so we would like the stairs to not be so slippery. We also want to build a better baby gate (like a door on hinges). Amelia has already figured out how to open the gate and with a new baby coming we need to make sure she doesn't open that gate up for a crawler to fall down. Eventually we plan on replacing the railing as well. I actually don't dislike the railing as much now that the stairs are painted but it is still not really our style.

For now we will call this space 20% finished. 

Happy Monday! 


Thursday, July 10, 2014

Furniture!!

After 3 months of living in our house we finally got some furniture! I will tell you that being pregnant and not having a couch was not fun. I had a hard time committing and was holding our for the perfect thrifted find. Well that didn't happen. We checked every good thrift store weekend after weekend until we (mostly me) caved and went to a furniture store. We walked in to the first store and immediately found the perfect set. 

I actually had my mind on a light (preferably grey) couch. With the walls grey and the rug grey and probably everything else grey Brian convinced me that color was the way to go. 

Let's take a peak back to where we started with our little living room.

Sorry this picture is terrible. It was a super dark rainy day. 

Then I showed you this progress picture after we painted the walls and trim. 

Keep in mind we still have plenty to do but here we are today.

I have done ZERO decorating in here so there is still plenty to do. We just got some curtains from West Elm and those are gonna get hung up pronto (that afternoon sun is killer). We also plan on hanging that mirror ($10 yard sale find)above the love seat. I need to get on decorating above the fireplace. We haven't decided yet if we are gonna put a TV up there. Our TV currently resides in the sun room.

So this is where we are now. We have a ton of unfinished projects but not much to show just yet. At 37 weeks pregnant I just finished painting the hallway today and my back is going to need a good 24 hours rest. We are nowhere near completing our "before baby" checklist but everything we do cross off is exciting. Hopefully I will have more to show after this weekend.  

Happy Thursday!